Monday, January 31, 2011
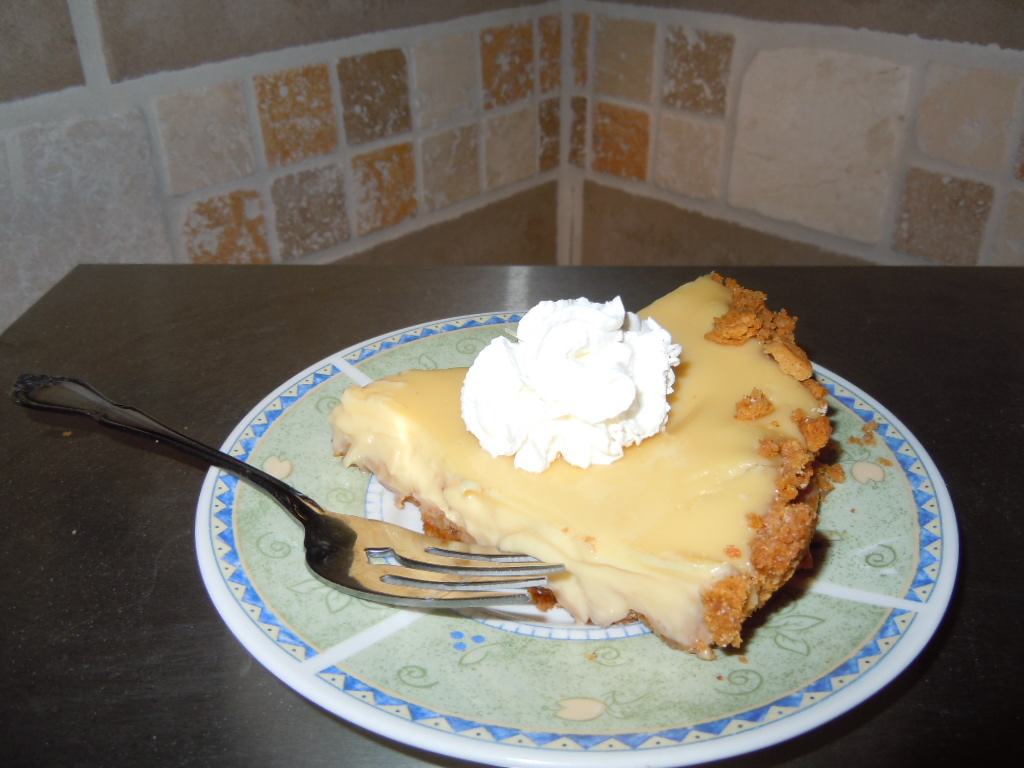
Key Lime Pie
Oh my, it's Key Lime Pie! What can I say? After one bite of this I closed by eyes and was immediately transported so some tropical local with sandy beaches, ocean breezes and the smell of salt water. Then I opened my eyes just in time to see one of my daughters hit the other on top of the head which was then reciprocated with another hit on the head by my other daughter. I then took another bite to see if I could transport myself again. No such luck with two mouths screaming at the same time. Oh, well! At least the pie relaxed me enough to handle their spat more patiently.
My mom is always on the search for a good piece of Key Lime Pie. She doesn't have luck very often. She even ordered a piece at a place down in Key West and said it wasn't that great. She is coming to visit us next month and I will make this for her. I have a feeling she is going to love it. Mom, if you are reading this you are in for a treat when you get here. This pie is smooth, tart, creamy, and dreamy!
Key Lime Pie recipe adapted from Two Peas and their Pod
1 1/4 cups graham cracker crumbs
3 Tbsp. sugar
5 Tbsp. butter, melted
1 (14 oz) can of sweetened condensed milk
4 large egg yolks
zest of 1 large key lime
1/2 cup key lime juice, from about 8 or so key limes or I just used bottled key lime juice
Preheat oven to 350 F. In a bowl, combine graham cracker crumbs, sugar, and butter with a fork. Mix until graham cracker crumbs are moist. Press mixture into a 9 inch pie plate. Pat down the bottom and sides. Bake for 12 minutes or until golden brown.

While crust is baking, prepare the filling. In a medium bowl, whisk together the sweetened condensed milk and egg yolks. Whisk until well combined. Add the lime zest, and lime juice. Whisk well. Set mixture aside. It will thicken up a bit as it sits.
When the crust has cooled slightly warm or room temperature, pour the filling over the pie crust. Bake for 15-17 minutes. Remove from oven and cool on a cooling rack.

When cool, chill pie in the refrigerator. The filling will set up nice as it cools. Chill for at least a hour before serving. Serve cold with whipped cream.
Sunday, January 30, 2011
Ginger-Spiced Pumpkin Muffins
There are so many pumpkin muffin recipes out there. I've tried quite a few of them myself. Like I said in my previous post, I like to try to make things using more whole grains. Some pumpkin recipes I've tried are super healthy but not very good and some are very good but not healthy at all. I found a recipe that is both healthy and absolutely FAB-U-LOUS! I got the base recipe out of Prevention magazine a few years back and have tinkered with it until it is perfect, in my professional opinion. I lived off these things when I was pregnant with my second child sometimes eating several a day. I didn't feel to bad because (A) I was pregnant and (B) they are nutritious. Her nick-name is "Spicy". Maybe it is from all the ginger and cinnamon she got while bak'in.


Ginger-Spiced Pumpkin Muffins
1 1/2 cups whole wheat flour or white whole wheat flour
1/2 cup packed brown sugar
2 tsp. baking powder
1 tsp. cinnamon
1 tsp. ground ginger
1/2 tsp. salt
1 egg
1 cup fat-free milk
1/2 cup canned 100% pure pumpkin
1/4 cup canola oil
1/2 cup mini-chocolate chips
1/2 tsp. grated orange zest (optional)
Preheat oven to 375 F. Lightly coat 12-cup muffin pan with spray or use the liners.
Stir four, sugar, baking powder, cinnamon, ginger, and salt in large mixing bowl.
Beat egg in small bowl 30 seconds, until foamy. Add milk, pumpkin, oil and orange zest if using. Beat well. Add to four mixture and stir until just moistened. Stir in chocolate chips.
Fill muffins tins 3/4 of the way full with batter. Bake for about 18-19 minutes until toothpick comes out clean. Just a tip; eat one while still warm because the chocolate chips are ooey and gooey and oh-so-good. These freeze really well too. I usually make a double batch and freeze half in ziplock bags.

Just a side note about a great food find. King Arthur Flour company sells a cinnamon that is absolutely amazing. Here is what it looks like. You can click on the link right above and it will take your right to their site. This cinnamon will change your life. I will never go back to regular super market cinnamon again. I find myself sprinkling it on everything lately.

Saturday, January 29, 2011
Pizza Night


Pizza Dough
2 to 2 1/2 cups white whole wheat flour
1 pkg (1/4 oz) quick-rise yeast or 2 1/4 tsp. quick-rise yeast
1Tbsp. dried oregano
1 tsp. salt
1 tsp. garlic powder
1 cup warm water (120 to 130 F)
2 Tbsp. olive oil
In the bowl of your mixer, combine 2 cups of the flour, yeast, salt, oregano, garlic powder. Add warm water and oil; beat until just moistened. Make sure not to knock over your expensive olive oil and spill it all over the counter and yourself like I did. Stir in enough remaining flour to form a soft dough (dough will be sticky). Use your dough hook on speed 2 and knead dough for about 5-6 minutes. If you don't have a mixer you could do this by hand on a lightly floured surface.

Place in a bowl coated with cooking spray, turning once to coat the top. Cover and let rise in a warm place for 30 minutes.
While the pizza dough is rising it is time to make the sauce. Can I just tell you how simple and delicious this no-cook sauce is. I make up one batch, enough to cover two pizza's. I usually only make one pizza so I freeze the remaining sauce for another time.
Pizza Sauce adapted from Mel's Kitchen Cafe
14 oz can of diced tomatoes
6 oz. can of tomato paste
1 tsp. sugar
1 tsp. oregano
1 tsp.basil
1 tsp. garlic salt


After your dough as risen, on a floured surface, roll dough into a 15 inch or so circle.


Transfer to a 14 inch pizza pan coated with cooking spray. Build up edges slightly. Prick dough thoroughly with a fork. Bake at 450 F for 5-8 minutes or until lightly browned.

Spread crust with your sauce and add your toppings of choice. We did canadian bacon, mandarin oranges and cheese. My kids don't like pineapple but love the oranges. It's actually really good. Bake for another 15-20 minutes until cheese is all melted and dough is cooked.
Thursday, January 27, 2011
English Muffin Toasting Bread
I love English Muffins! I always make sure that we never run out of them. I can honestly say that I eat them EVERY day. When I found this recipe I knew I had to try it. This I assure you is a great one. The yeasty, coarse-textured bread makes the best toast ever. It is so easy to make. You basically just mix-it-slap-in-the-pan-bake-and-eat-it! And by the way, can I just express how divine your home smells while fresh bread is baking. Do they make a candle in that scent?
English Muffin Toasting Bread
3 cups unbleached all-purpose flour
1 Tbsp. sugar
1 1/2 tsp. salt
1/4 tsp. baking soda
1 Tbsp. instant yeast
1 cup milk
1/4 cup water
2 Tbsp. olive oil or vegetable oil
cornmeal to sprinkle in the pan
Whisk together the flour, sugar, salt, baking soda, and yeast in a large mixing bowl. (I used my kitchen aid for this)

Combine the milk, water, and oil in a separate, microwave-safe bowl, and heat to between 120 and 130 F. The liquid should feel very hot (hotter than lukewarm), but not so hot that it would scald you.

Pour the hot liquid over the dry ingredients in the mixing bowl (kitchen aid bowl). Beat at high speed for 1 minute. The dough will be very soft.
Lightly grease and 8 1/2 X 4 1/2 inch loaf pan, and sprinkle the bottom and sides with cornmeal.
Scoop the soft dough into the pan, leveling it in the pan as much as possible.

Cover pan and let dough rise till it's just barely crowned over the rim of pan. This will take about 45 min to and hour.
Preheat your oven to 400 F. Remove cover and bake the bread for 20-22 minutes or until golden brown and the interior temperature is 190 degrees. Remove the bread from oven and after 5 minutes turn it out of the pan onto a rack to cool. Slice and enjoy toasted, or the way I had it with just a smearing of Brummel & Brown spread.


Black Bean and Salsa Soup
Let me start off by saying that I love soup! I love it especially in the winter. It is usually something that I order when out to eat. I have so many soup recipes that are excellent but usually take lots of time with the chopping and simmering. This recipe is one of my favorites. It is simple to make, healthy and delicious. What more could you ask for? I found this recipe over at Annie's Eats and have made it many times when I am rushed to get dinner on table. I did make just a few changes to her original. I always have the ingredients on hand.
Black Bean & Salsa Soup
2 cans of black beans, drained & rinsed
1 1/2 cups vegetable broth (I usually just you chicken though)
1 cup salsa
1 tsp. cumin
sour cream, shredded cheese, green onion for garnishing

Combine beans, broth, salsa & cumin in a saucepan over medium high heat until simmering. Ladle 3/4 of the mixture into a blender and blend until smooth. Pour back into the saucepan with the other 1/4 of mixture and mix to combine. Serve with garnished if desired.
Just a note: I would double this if feeding more than 4 people. Also, if you have an immersion blender that would work great for this recipe.

Wednesday, January 26, 2011
Cookies of Insane Greatness
Have I got a cookie recipe for you! I apologize in advance for any of you who are still working on that New Year's resolution to eat better. If I had to choose my favorite cookie it would be chocolate chip. This recipe takes a plain old chocolate chip cookie and transforms it into a party for your mouth. Your tummy is going to love you and your hips, thighs and personal trainer are going to hate you. I got this recipe from Jenny over at Picky Palate. These cookies are ooey gooey on the inside and crisp on the outside. Here is your lineup:
Candy Bar Chocolate Chip Cookie Sandwiches
2 sticks softened butter
1 cup granulated sugar
3/4 cup brown sugar
2 large eggs
1 Tbsp. pure vanilla
3 1/2 cups all purpose flour
1 tsp. baking soda
1/2 tsp. salt
10 oz. bag chocolate chips (I used minis)
Variety of snack size Reese's, Snicker's, Kit Kat's etc.

Preheat oven to 350 degrees. In a stand mixer, cream butter and sugars until well combined. Add eggs & vanilla until well combined.
Place flour, baking soda and salt in large bowl, mix then slowly add to your wet ingredients. Add chocolate chips to combine. Look at this yummy cookie dough. I could just take a spoon and dig in but I practiced my self control.

Using a cookie scoop take one scoop of cookie dough and place on top of snack size candy bar. I used Reese's Peanut Butter Cups, Snicker's, Milky Ways, Twix & Kit Kat's.

Then take another scoop and place it on the bottom of candy like so:

Now just seal the edges together by pressing and cupping in your hand until candy bar is enclosed with dough.

Place onto parchment or Silpat lined baking sheet and bake cookies 13 minutes or so until cookies are baked to your liking. Let cool 5 minutes before transferring to cooling rack.

Just look what you have inside when you cut them in half. These are just calling for a big glass of milk.

Candy Bar Chocolate Chip Cookie Sandwiches
2 sticks softened butter
1 cup granulated sugar
3/4 cup brown sugar
2 large eggs
1 Tbsp. pure vanilla
3 1/2 cups all purpose flour
1 tsp. baking soda
1/2 tsp. salt
10 oz. bag chocolate chips (I used minis)
Variety of snack size Reese's, Snicker's, Kit Kat's etc.

Preheat oven to 350 degrees. In a stand mixer, cream butter and sugars until well combined. Add eggs & vanilla until well combined.
Place flour, baking soda and salt in large bowl, mix then slowly add to your wet ingredients. Add chocolate chips to combine. Look at this yummy cookie dough. I could just take a spoon and dig in but I practiced my self control.

Using a cookie scoop take one scoop of cookie dough and place on top of snack size candy bar. I used Reese's Peanut Butter Cups, Snicker's, Milky Ways, Twix & Kit Kat's.


Just look what you have inside when you cut them in half. These are just calling for a big glass of milk.

Tuesday, January 25, 2011
Flat Bread
Okay, I will admit it. I am a total carbs in the form of breads lover! I would choose a fresh homemade roll over a piece of cake any day. I have up until recently been intimidated by making my own breads. Using yeast has always been a little scary to me. I have decided that this is the year to get over my fear. I've been experimenting a lot lately and have found that it isn't that bad at all. I might even go as far as saying that I find it very relaxing.
I made the most awesome bread last night. I got this recipe from one of my favorite food blogs Our Best Bites. They said it was a great recipe to try if you are starting out in your bread making abilities, perfect for me. This is a flat bread that I might add would impress anyone who you might be having over for dinner. It was just like those artisan breads you see in bakeries. The outside was chewy (in a good way) and the inside soft and fluffy like. I LOVED it! My husband and girls loved it too. So, go ahead and give this one a try. I promise you won't be disappointed.
Here is your line up:
Flat Bread
1 cup warm water (105-115 F)
2 packets or 1 Tbsp. + 2 tsp. active dry yeast
1 tsp sugar
2 1/4-2 1/2 cups all-purpose flour
2 Tbsp. extra virgin olive oil
2 tsp. Kosher salt, divided

In a small bowl, combine water, yeast, and sugar and allow to stand for 10 minutes or until bubbly. It will look like this:


Add in another 1/4 to 1/2 c. flour until a very soft dough is formed. Cover with a clean towel and allow to stand about 1 hour or until doubled in bulk.
Spray a baking sheet and your hands with cooking spray. Punch dough down and then remove the dough from the bowl and shape into a ball. Place onto prepared baking sheet and spread into a circle about 1/2" thick and 11-12" in diameter. Cover and allow to rise another 30 minutes.
While dough is rising, preheat over to 400. When dough has risen, use your fingers to make indentations in the dough.


I made the most awesome bread last night. I got this recipe from one of my favorite food blogs Our Best Bites. They said it was a great recipe to try if you are starting out in your bread making abilities, perfect for me. This is a flat bread that I might add would impress anyone who you might be having over for dinner. It was just like those artisan breads you see in bakeries. The outside was chewy (in a good way) and the inside soft and fluffy like. I LOVED it! My husband and girls loved it too. So, go ahead and give this one a try. I promise you won't be disappointed.
Here is your line up:
Flat Bread
1 cup warm water (105-115 F)
2 packets or 1 Tbsp. + 2 tsp. active dry yeast
1 tsp sugar
2 1/4-2 1/2 cups all-purpose flour
2 Tbsp. extra virgin olive oil
2 tsp. Kosher salt, divided

In a small bowl, combine water, yeast, and sugar and allow to stand for 10 minutes or until bubbly. It will look like this:

In a bowl of a heavy-duty electric mixer, combine 2 c. flour, olive oil, and 1 1/2 tsp. salt. Add in your yeast mixture and mix until combined.

Add in another 1/4 to 1/2 c. flour until a very soft dough is formed. Cover with a clean towel and allow to stand about 1 hour or until doubled in bulk.
Spray a baking sheet and your hands with cooking spray. Punch dough down and then remove the dough from the bowl and shape into a ball. Place onto prepared baking sheet and spread into a circle about 1/2" thick and 11-12" in diameter. Cover and allow to rise another 30 minutes.
While dough is rising, preheat over to 400. When dough has risen, use your fingers to make indentations in the dough.

Lightly brush with olive oil and sprinkle with remaining Kosher salt. Bake for 20-25 minutes or until golden brown. Allow to cool slightly and then just tear into pieces or cut into triangles like a pizza. This bread is awesome without butter or anything. But I think next time I might sprinkle some herbs on the top.

Subscribe to:
Posts (Atom)


- momof2girls
- One of the many jobs I have as a stay at home mom is to cook. I love being in the kitchen and creating yummy dishes to feed my family. I started this blog as a way to virtually capture my most valuable recipe creations and finds. I hope you enjoy!


