Showing posts with label Quick and Easy. Show all posts
Showing posts with label Quick and Easy. Show all posts
Wednesday, September 28, 2011
Chicken Salsa Verde Bake
 Wednesday, September 28, 2011 |
  Posted by
momof2girls |
Posted by
momof2girls |


I have been a little sparse with my postings lately. I apologize for that. I promise my family is not starving and I still make dinner almost every night of the week. My problem is that I've been making repeats or dishes that I'm not exciting about sharing with you. I've been on a quick and easy dinner kick lately. My girls beg me to go swimming with them every afternoon which cuts into dinner making time. Well worth it I might add but it doesn't leave me much time to get creative. This is one of those great quick and easy dinners that you can throw together in no time, even early in the day if you wish. After our afternoon swim yesterday I ran inside and this was ready to bake in the oven within 10 minutes. This is how my daughter kept herself occupied while dinner was baking.

She had a great desire to make a rocket out of a cardboard box I had laying around. This was all her idea. She did a great job decorating it with her markers. I got a worked up an appetite pushing her and her sister around the dining room in this thing. I am sorry to say that this poor rocket didn't make it through the night. They don't make cardboard like they used to. Hope everyone is having a great week. Enjoy!!
Chicken Salsa Verde Bake
adapted from Every Day with Rachael Ray Magazine
2 1/4 pounds boneless, skinless chicken breasts (cooked & shredded)
2 (16 oz) jars of salsa verde or regular mild salsa
1 (15 oz) can black beans, rinsed and drained
1 onion, finely chopped
1 cup sour cream (I used light)
3 cups crushed tortilla chips
1 (8 oz) bag shredded Mexican-style cheese
Preheat oven to 375 degrees. In a large bowl mix together cooked chicken, salsa, beans, onion and sour cream.
Grease a 9x13-inch baking dish. Scatter 1 cup of tortilla chips on the bottom and top with half of the chicken mixture and half of the cheese. Repeat layers and cover with the remaining 1 cup tortilla chips. Bake until cheese is bubbly, about 30 minutes.

This is what my daughter's plates looked like. I rounded it out by making a cheese quesadilla on a whole wheat tortilla which they dipped in sour cream and some grapes.
Linked this recipe up with Join Aggie's Kitchen and Real Mom Kitchen.
Tuesday, August 30, 2011
Baker's Dozen Yeast Rolls

The summer has just flown by. I can hardly believe how fast this year is moving. It scares me a little because I feel as though my kids are growing up too fast and I want to enjoy them at the age they are now a little longer. I know I can't stop them from growing so I need to cherish these times as much as I can and make time for them even when it might seem inconvenient.
The cooler weather is right around the corner. Now this is something I look forward too after our extremely warm summers here in Arizona. I heard on the news just this morning that this is the 9th straight day of extreme temperature warnings. If we have another one tomorrow it will break the record. So you can see where I would look forward to the cooler weather. Something else I look forward to is making and eating more soups and breads such as this roll recipe here. These utilize quick-rise yeast so they are so quick and easy to make if you need them last minute. They have a yummy honey-garlic topping that makes them extra special. They will be the perfect partner for soup or chili. I hope you enjoy!
Baker's Dozen Yeast Rolls
recipe source Taste of Home Simple & Delicious
2 to 2 1/2 cups all-purpose flour
2 Tbsp sugar
1 pkg. (1/4 oz or 2 1/4 tsp) quick ruse yeast
1/2 tsp salt
3/4 cup warm water (120 to 130 degrees)
2 Tbsp plus 4 tsp butter melted and divided
3/4 cup shredded sharp cheddar cheese ( I just used medium)
2 tsp honey
1/8 tsp garlic salt
In a large bowl, combine 1 1/2 cups flour, sugar, yeast and salt. Add water and 2 Tbsp butter; beat on medium speed for 3 minutes or until smooth. Stir in cheese and enough remaining flour to form a soft dough.
Turn onto a lightly floured surface; knead until smooth and elastic, about 4-6 minutes. I actually just did this in my Kitchen-Aid. Cover and let rest for 10 minutes.
Divide into 13 pieces. Shape each into a ball. Place in a greased 9-inch round baking pan. Cover and let rise in a warm place until doubled, about 30 minutes.

Bake at 375 for 11-14 minutes or until lightly browned. Combine the honey, garlic salt and remaining butter; brush over rolls.
Tuesday, June 28, 2011
Chocolate Cupcakes with Peanut Butter Cream Cheese Frosting

I guess I have cupcakes on the mind. I've got another one for all you chocolate lover's out there. If you are also a peanut butter fan than you will be in cupcake heaven with these babies. My favorite candy had always been the Reese's Peanut Butter Cup. This is the one and only thing that I snag from my kids Halloween buckets. When I was younger and thought nothing about the amount of calories I ate on a daily basis (ah, the good old days) I would buy a whole bag of Reese's and consume the entire bag within a day or two. Oh, how guilty I would feel if I did something like that now. These cupcakes are really, really good. I just used a simple chocolate cake mix (Duncan Hines is my favorite brand). The frosting recipe comes from Your Homebased Mom and it is what takes these cupcakes over the top. It is simple but amazing. These would be great for a birthday party, shower, potluck, 4th of July picnic, or just because you are craving chocolate. I hope you enjoy! Stay cool!
Chocolate Cupcakes with Peanut Butter Cream Cheese Frosting
Chocolate Cake Mix for 2 Layer Cake & ingredients to prepare
Peanut Butter Frosting:
8 oz. cream cheese, softened to room temperature
1/2 C creamy peanut butter
2 tsp vanilla
6 C powdered sugar.
2-4 tsp of milk until desired consistency
Prepare and bake cupcake according to cake mix directions; cool completely.
Meanwhile, beat cream cheese, peanut butter and vanilla until light and fluffy. Gradually add in powdered sugar. Add milk, 1 tsp at a time until desired consistency.
Fill a Ziplock Bag with the frosting and snip a little corner of the bag with scissors. Squeeze gently and frost the cupcakes in a circular motion. Top with a Reese's Peanut Butter Cup if desired.
Monday, June 20, 2011
Spaghetti with Roasted Zucchini

I hope everyone had a wonderful weekend and Happy Father's Day. We are pretty low key in our festivities for these particular holiday's. Anyways, my husband ended up with a stomach bug of some kind so he wasn't up for any special Father's Day meals. He is much better today, hopefully the rest of our household doesn't catch it. I am very grateful to have such a wonderful father for my children and I get a bit teary eyed when I see the girls give him hugs and kisses and tell him they love him and Happy Father's Day.
I've got a quick and easy weeknight meal idea here for you today. I like to eat vegetarian a few nights a week. One reason is that it saves money but also it's healthy as long as you substitute plenty of vegetables in the place of meat. With this meal you don't miss the meat at all but you could add some chicken or shrimp if you wanted too. I enjoyed the smell of the fresh garlic roasting along with the zucchini. Roasted garlic is one of my favorite savory smells, cake baking would be my favorite sweet smell. Anyways, I hope everyone has a great Monday and enjoy your week.
Spaghetti with Roasted Zucchini
recipe adapted from Woman's Day magazine
12 oz spaghetti, I used whole grain
3 Tbsp olive oil
2 1/2-inch slices of fresh whole wheat bread, torn into pieces
2 cloves of garlic, smashed
4 small zucchini sliced 1/4 inch thick
kosher salt
1/4 cup grated Parmesan
1/4 cup flat-leaf parsley, chopped
1 Tbsp grated lemon zest
Heat oven to 425 F. Cook pasta according to directions. Drain the pasta and return to the pot. Toss the pasta with 1 Tbsp oil. Set aside.
Meanwhile, in a food processor, pulse bread and garlic until the bread forms coarse crumbs and garlic is chopped.
In a large bowl, toss the zucchini, remaining 2 Tbsp oil and 1/2 tsp salt. Add the Parmesan and bread crumb mixture and toss to combine. Spread zucchini mixture on 2 rimmed baking sheets and roast until the zucchini is tender and golden brown, 12 minutes or so.
Toss the pasta and zucchini mixture with parsley and lemon zest. Enjoy!
This post is liked to Mom's Crazy Cooking
Thursday, June 16, 2011
Chocolate Chip Peanut Butter Balls (Healthy)

I've got a quick and easy snack recipe for you. Your kids are going to love them and you are going to love that they are healthy. Most of the ingredients to make these are probably in your cabinet or pantry. This would be a simple recipe to let your kids help out with. Hope you enjoy and have a great weekend.
Chocolate Chip Peanut Butter Balls (Healthy)
Recipe Source Go Graham Go
1 1/2 cups of quick cooking oats
1/2 cup of peanut butter
1/2 cup of honey (I use just a little less than 1/2 because I prefer them to be more firm)
1/2 cup of semi-sweet chocolate chips
Preparation:
Toss the oats into the food processor and blend until you have fine pieces. In a separate bowl, mix together the peanut butter and honey. Next, add in the chocolate chips. Add the oats to the mixture and mix well. You may need to use your hands to make sure every last bit of the oats has been mixed into the pb/honey/choc chip mixture. Roll into small balls and refrigerate for a few hours or you could freeze them for several months.
Post linked to Good Cheap Eats & At Home With Haley & Mom's Crazy Cooking
Thursday, June 9, 2011
"Fried" Crispy Chicken

I had to force myself to turn the oven on. It is getting hot here much like everywhere else I'm sure. I'm just having a hard time lately cooking meals that are served warm. Like I've said in a previous post I just want to eat salads and fruit for every meal. My husband would not enjoy having a salad placed before him every night so like I said, I forced myself to turn the oven on and make this chicken dish. I will tell you that I loved it. It's a keeper for sure. I found this in Woman's Day magazine. The lady that submitted it said that this is what here mom would make before her tennis matches for good luck. This is a fun way to use the leftover Rice Krispies at the bottom of the bag. While we are on that subject, why does that always seem to happen in our house. There will be this Jumbo cereal box that is practically empty except for the tiny bit of cereal left at the bottom. Does this happen in anyone else's house or just mine. Anyways, the chicken turned out really moist, I'm guessing because it was marinating in yogurt and that acts as a tenderizer. I'll let you in on a little secret, I diced up some leftover's the following day and put them in a salad. I couldn't resist. I hope you are all having a wonderful week. It's almost weekend time!
"Fried" Crispy Chicken
Adapted slightly from Woman's Day magazine
4 cups Rice Krispies, lightly crushed
3/4 cup grated Parmesan Cheese
2 Tbsp olive oil
1 Tbsp paprika
1 tsp ground cumin
salt and pepper
1 cup lowfat plain yogurt
8 (6oz) boneless, skinless chicken breasts
Combine the yogurt and chicken breasts in a large resealable plastic ziplock. Allow to marinate for 1 to 4 hours.
Heat oven to 350 F. Line a baking sheet with foil or parchment paper.
In a shallow bowl or pie plate, combine rice cereal, Parmesan, oil, paprika, cumin, 1/2 tsp salt and 1/4 tsp pepper.
Press chicken breasts into the cereal mixture to help it adhere; place on the prepared baking sheet. Bake until golden brown and cooked through, 25-30 minutes.
Monday, June 6, 2011
Marinara Meatballs with Pasta

It's getting warm here in Arizona. I think we are in it for the next 3 to 4 months. What a great blessing the air-conditioner is this time of year. I will endure the hot summer because I know that from October through May we get to enjoy pretty nice weather. This time of year when it gets hot I tend to crave salad's. In fact, I've had a salad for the past 3 days in a row. It's very hard for me to eat heavy and hot things, even in the air-conditioning. I had a package of ground turkey in the fridge that needed to be used so I decided to make my favorite meatball recipe. I wasn't really craving them and I would have rather had another nice big salad but no lettuce could be found in the house. I have to say though they really hit the spot and I'm glad I made them after all. These are so quick and easy to make. I use ground turkey but you could use ground sirloin or hamburger meat if you prefer. When we were in California last week I stocked up on my favorite marinara sauce from Trader Joe's.

Marinara Turkey Meatballs with Pasta
1 lb ground turkey
1/4 cup dry breadcrumbs
1 egg
3/4 tsp dried basil
3/4 tsp garlic salt
1/4 tsp pepper
1/4 cup Parmesan cheese, grated
26 oz tomato basil marinara sauce or homemade
Dried pasta noodles of your choice (I used whole wheat)
Heat oven to 425 F.
In a bowl combine turkey, breadcrumbs, egg, dried basil, garlic salt, pepper, and Parmesan cheese; mix until just combined. Shape into 1 inch sized meat balls and place on a baking sheet that has been lined with foil.
Bake for about 15-20 minutes or until cooked through.
Bring a large saucepan of water to boil and cook noodles according to package directions.
Meanwhile, in a large saucepan combine the marinara and the cooked meatballs. Bring to a gentle simmer, cover, and turn heat to low. Allow to simmer for 15 minutes.
Serve meatballs and marinara over noodles and sprinkle with additional Parmesan cheese if desired.
This post is linked to Good Cheap Eats
Friday, June 3, 2011
Mixed Grill Kabobs

I love grilling! I think the reason I love it so much is because I don't have to dirty pots and pans so my kitchen stays somewhat cleaner. I also love that grill flavor that only comes from a BBQ, an indoor grill pan just doesn't cut it. I've got a super simple one for you today. This will suit both beef and poultry fans. I found this recipe in the June 11 Family Circle magazine. Here how it goes. You buy a bottle of this Vidalia Onion dressing which by the way smells amazing.

You then marinate your beef, chicken, and veggies in 3 separate bags for about 30 minutes. Then it is time to skewer them and grill. Super easy, healthy, and delicious. Use whatever veggies you wish. I think button mushrooms, cherry tomatoes, pepper's, or onions would be great. I hope everyone has an awesome weekend.
Mixed Grill Kabobs
adapted slightly from Family Circle magazine
1 lb sirloin, cut into 1 1/2 inch pieces
1 lb boneless, skinless chicken breasts cut into 1 1/2 inch pieces
2 medium squashes, trimmed, halved lengthwise and cut into 1/2 inch rounds
2 medium zucchini, trimmed, halved lengthwise and cut into 1/2 inch rounds
1 bottle of Ken's Vidalia Onion dressing
Soak a dozen 12 inch bamboo skewers in warm water. Combine steak and 1/2 cup dressing in resealable bag. Refrigerate for 30 minutes to marinate.
Combine chicken and 1/2 cup dressing in resealable bag. Refrigerate for 30 minutes to marinate.
Combine all the veggies in a separate resealable bag and 1/2 cup dressing to marinate along with the meats.
Heat gas grill to medium high or charcoal grill to medium hot. Thread beef and veggies on skewers and then chicken and veggies on separate skewers.
Grill chicken kabobs 4 minutes per side, until cooked through and beef kabobs for 3 minutes per side until cooked through. Serve with extra dressing for dipping.
Thursday, June 2, 2011
Carrot Quick Bread

Ahhhh, finally back home from our week long vacation in sunny California. We had the best time ever and really wanted to stay just a little longer. Now that we are back to reality I am happy to get back on schedule. As soon as we arrived home I worked like mad to get everything unpacked, washed, and put away. I'm the type of person that can't relax until all these things are done after we've been gone. I was so excited to get back into my own kitchen and bake today. Although I had access to my sister-in-law's kitchen while on vacation I was happy to be back in my own where everything is familiar to me. The drive home from California to Arizona is about 5 hours. It seems more like 10 when you are riding with a 3 and 4 year old. I try to bring along a stack of magazines to browse through, it makes the time go by faster. I was flipping through a Better Homes and Gardens and found a recipe for this delicious sounding Carrot Bread with Cream Cheese Icing. I love

I left off the cream cheese icing. I was out of cream cheese and I think it is sweet enough without it. I have included the recipe in case you want to try it. This bread would be perfect for breakfast, brunch, or even just a snack. I hope you enjoy!
Carrot Bread with Cream Cheese Icing
Recipe Source Better Homes and Gardens
2 cups whole wheat white flour or all purpose flour
2/3 cups packed brown sugar
2 tsp baking powder
1 tsp cinnamon
1/2 tsp nutmeg
1/4 tsp baking soda
1/4 tsp salt
2 cups shredded carrots
2 eggs, beaten
2/3 cups milk
1/3 cup canola oil
1 recipe cream cheese icing, recipe below if desired
Preheat oven to 350 F. Grease bottom and 1/2 inch up sides of an 8x4x2 inch loaf pan, set aside.
In a bowl stir together flour, brown sugar, baking powder, cinnamon, nutmeg, soda, and salt. In another bowl combine carrots, eggs, milk, and oil; add to dry ingredients, stirring until just moistened.
Pour batter into prepared pan. Bake for 50-55 minutes or until toothpick inserted in the center comes out clean. Check the loaf 10 minutes before end of baking. If it is browning too quickly, cover loosly with foil for the remainder of the cooking time. Cool in pan 10 minutes; remove and cool completley on a rack. Glaze with cream cheese icing if desired.
Cream Cheese Icing
Whisk together 2 Tbsp of cream cheese, 3/4 cups powdered sugar, and a little milk (3 to 4 teaspoons) until smooth and glazelike. Drizzle over Carrot Bread.
Sunday, May 22, 2011
Cream Cheese Chicken Enchiladas
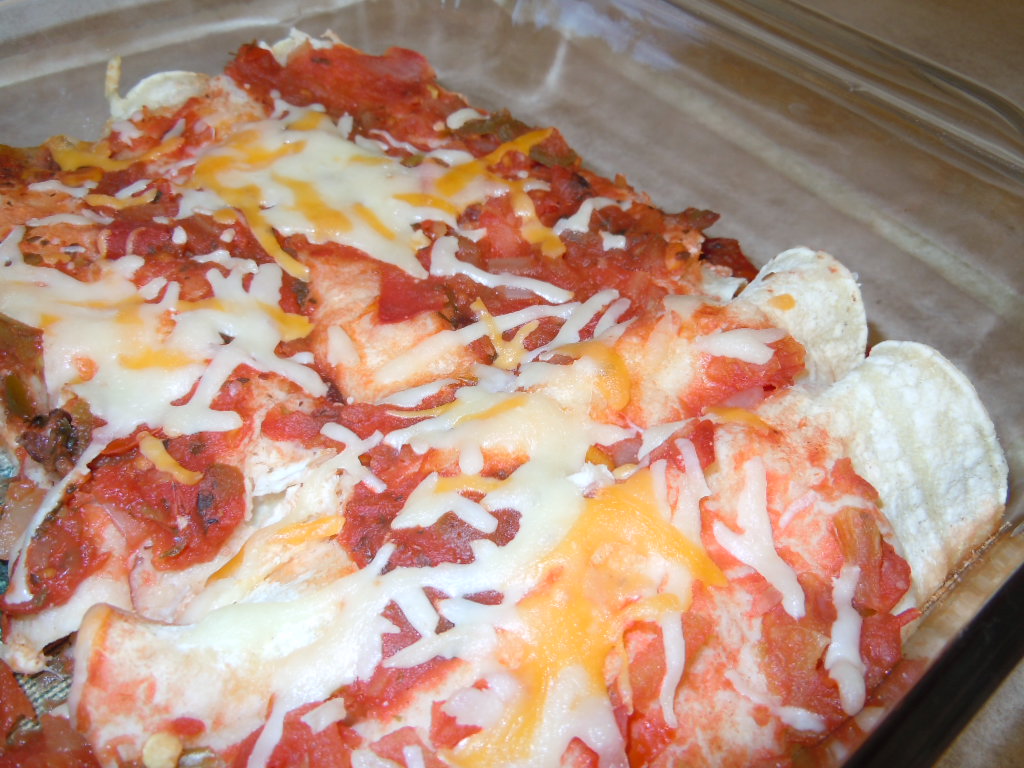
I was having another Mexican food craving and it just had to be satisfied. I was able to do just that with an exceptional recipe I found on a blog called Bun's in my Oven, slightly similar in name to my own blog. She just raved about this recipe and said that she makes it part of her dinner rotations quite often because it is one of her families favorites. I loved the idea of cream cheese mixed into the filling and was excited to try it out for myself. I adapted the recipe just a tad by adding black beans (my kids like them) and switching out the enchilada sauce for salsa. Oh, and I used plain Greek yogurt in the place of the sour cream. These did not disappoint me. I really, really liked them. I would say that I like them just as much as the Honey Lime Chicken Enchiladas I have on my blog. I used a mix of both corn tortillas and whole wheat flour tortillas. Either one will work for this recipe so use what your family likes best. I hope you enjoy and have a great week.
Cream Cheese Chicken Enchiladas
slightly adapted from buns in my oven
- 5 ounces cream cheese, softened
- 1/4 cup light sour cream or Greek yogurt
- 10 ounces enchilada sauce or 2 cups of salsa
- 1 cup shredded cheddar cheese, divided
- 1 cup shredded monterey jack cheese, divided
- 2 cups cooked shredded chicken
- 1 cup frozen corn kernels, thawed (canned corn works just fine, but drain it first)
- 1 cup black beans, drained & rinsed
- 4 oz. diced green chiles
- 1/2 teaspoon chili powder
- 1/4 teaspoon cumin
- Salt and pepper
- 4 scallions, thinly sliced
- 8 flour or corn tortillas
In the bowl of your mixer cream together the cream cheese, sour cream, and 1/2 of the enchilada sauce or 1/2 cup of the salsa. Stir in 1/2 cup of each type of cheese.
In a second bowl toss together the chicken, corn, black beans, cumin, chili powder, salt and pepper, green chiles, and half of the scallions. Add the chicken mixture to the cheese mixture and combine well.
Spread about half of the remaining enchilada sauce or salsa in the bottom of the baking dish.
Spoon the filling into each tortilla, roll the tortilla up, and place in the baking dish with the seam down. Pour the remaining enchilada sauce or salsa over the top of the filled tortillas and sprinkle with the remaining cheese. Bake for 20-25 minutes or until hot and bubbly. Sprinkle with the remaining scallions and serve.

Sunday, May 15, 2011
Lasagna Purses

I found another use for my favorite food at the moment...EGG ROLL WRAPPERS. I am having so much fun using these things and I don't think it's going to end anytime soon.

These little Lasagna Purses are so cute. I love to make "cute food". It makes it more fun to eat. I also liked the idea of individual lasagnas. I'm thinking that this would be a great recipe that you could make extra of and freeze for a quick dinner when the time might arise. They would also be perfect for you or your child's lunch box.
These little lasagnas are very good. They have all the flavors of a traditional lasagna but the top gets crispy, which I really enjoyed. If you are the type of person that enjoys the crunchy topping on top of casseroles or mac & cheese than these are for you. I hope you enjoy and have a great week!
Lasagna Purses
Recipe Source Big Red Kitchen
For the sauce:
3/4 pound Italian sausage out of the casings, cooked, crumbled, and drained. Add:
2 cups favorite marinara or pasta sauce, and simmer over low heat until needed.
For the Ricotta Filling
2 pounds ricotta cheese
2 eggs
2 cups shredded Italian Blend cheese
1 tsp. Kosher salt
1/4 tsp. fresh cracked black pepper
1/3 cup fresh parsley, chopped
Mix all ingredients together and set aside until ready to use.
48 Egg Roll Wrappers
olive oil for brushing
Place one egg roll wrapper in each of the 24 greased, standard muffin tin wells. Press each down gently until it fills the bottom of each well, taking care not to rip the wrapper. Using half of the Ricotta Filling, fill each wrapper with a spoonful of cheese, about 1 tablespoon. Top each with a spoonful of sauce, then repeat the layers: wrapper, cheese, sauce. One at a time, fold the excess wrapper of each purse toward its center. Brush liberally with olive oil and bake in 350 degree oven for 25-30 minutes or until golden brown. Remove each purse from the pan carefully and place on a pretty platter. Let set about 5-10 minutes before serving, they are HOT. Also good at room temperature. These freeze well. Makes 24 Purses.
*Note- to cut in half, it is easier to turn the purse over and using a sharp knife saw through from the bottom to the top.

Tuesday, May 10, 2011
Mexican Chicken Manicotti

I am on a Mexican food kick lately. I don't know why but it always sounds so good for dinner. This recipe utilizes my favorite Egg Roll Wraps again. These things are so much fun to use.

Years and years ago I found a recipe in Taste of Home magazine that took your basic manicotti and gave it a Mexican twist. I saved it forever thinking that it would be fun to make but never got around to it. I finally dusted it off yesterday deciding to give it a try but changing a few of the ingredients to make it my own. I was very pleased with the results. As we were eating dinner my 3 year old daughter looked at me and said, "Mommy (chew, chew, chew)...this is really good". That made me feel good, especially coming from a 3 year old. They are healthy too as long as you use lighter ingredients and go light on the cheese. I am getting to the point were I no longer use sour cream anymore. I prefer the texture, taste, and nutrition of Greek yogurt instead. This would also make a great meal if you needed to take dinner to someone, they would be very pleased. I hope you enjoy!
Mexican Chicken Manicotti
1 1lb package of Egg Roll Wraps or manicotti shells
2 cups cooked, shredded chicken
1 can black beans, drained and rinsed
2 cups shredded monterey jack cheese (divided)
1 cup shredded cheddar cheese
1 cup plain Greek yogurt or sour cream
1 small onion, diced and divided
1 4 oz can chopped green chilies, divided
1 small can condensed cream of chicken soup
1 cup salsa
2/3 cup milk
If using manicotti shells, cook according to package directions.
Preheat oven to 350 F.
In a large bowl combine the chicken, 1 1/2 cups jack cheese, cheddar cheese, yogurt, black beans, half of the onion, and 1/2 of chilies.
In another bowl, combine soup, salsa, milk, and remaining chilies and onion.
Spread 1 cup of the soup mixture into a greased 9x13 inch baking dish. Lay egg roll wrapper on work surface. Place a heaping scoop of chicken mixture onto the center of egg roll. Fold corners in as you roll up to enclose the filling. Alternately, if using manicotti shells, stuff each with chicken mixture. Arrange over sauce in baking dish. Pour remaining sauce over shells. Cover and bake for 30 minutes. Uncover, sprinkle with remaining jack cheese and bake 10 minutes longer.

Wednesday, May 4, 2011
Split Pea Soup (Slow Cooker)

I have a super secret vegan source of protein that you are probably missing out on. From my picture you can clearly see it's SPLIT PEAS! Split peas have an impressive 11 grams of protein per quarter cup. That is a lot. They are not at all gross, I promise. This soup is a wonderful way to use that leftover Easter ham bone, which is what I did. It gives the soup great flavor. If you don't have a bone you can also just use leftover ham (without bone) and it will taste great too, I've done it both ways. Something else I do is to throw in some extra baby carrots. They will be all nice and tender when the soup is done cooking. My kids love them this way. I know it's not really soup weather in many part of the country but I don't care. I make soup year round because I love it so much. It does taste extra good when the weather is rainy or cold. Just lower your air conditioner for a few minutes and pretend that it is cold out while you devour your soup. Enjoy!
Split Pea Soup
1-1lb package of split peas
1 ham bone with some meat on it
3 large carrots, diced small
1 onion, diced small
3 celery stalks, diced small
2 qts water
1 tsp salt maybe more to taste
1/4 tsp pepper
Combine all ingredients in slow cooker. Cover and cook on low for 8-10 hours. I usually turn my slow cooker to high the final 2 hours of cooking to make sure that the peas get cooked all the way. Also, I make sure that there is enough water and the soup isn't too thick. Remove ham bone; cut meat off, dice, and return meat to soup.
Makes 8 servings

I must say there is no other way to eat this soup than with a nice big slice of my Cake Like Cornbread. You can find the recipe HERE.

Thursday, April 21, 2011
Chicken Pillows

I seem to have a bit of an obsession lately. I have a strong desire to wrap my food up in some kind of manner. Whether it be the Stuffed Pizza Rolls, the Cheeseburger Flatbread Melts, the Southwestern Egg Rolls, or the Chicken Taquitos (you get the picture). Watch out, I'm not done yet! These Chicken Pillows are no exception. What can I say? I love them, they are awesome, and I can't wait to make them again soon because I am already craving the delicious filling that comes oozing out when you take a bite of the flaky crescent roll. This is my take on a similar recipe I found over at The Girl Who Ate Everything. I changed it up a bit to make them somewhat more healthy, hey I gotta try. She dipped hers in melted butter and rolled them in dry breadcrumbs before baking. I skipped this step because crescent dough is already quite buttery and rich. She also serves hers with a chicken type gravy. I also skipped this step because I didn't like the thought of a soggy pillow. I will include her recipe for the gravy in case you are interested in that part. I think a nice side salad or side of fruit would be the perfect side dish with these to make them a light Spring or Summer meal. I hope you enjoy!
Chicken Pillows
adapted slightly from The Girl Who Ate Everything
8 oz cream cheese softened, I used 1/3 less fat
1/2 cup sour cream
1/2 tsp salt
1/4 tsp pepper
1 1/2 Tbsp dried chives
1 1/2 Tbsp minced fresh onion
5 oz frozen spinach, thawed and squeezed dry
3 chicken breasts cooked, diced really small
2 (8oz) cans Pillsbury Crescent Dough
GRAVY if desired:
1 (14.5 ounce) can cream of chicken soup
1 (0.87) package chicken gravy mixPreheat oven to 350 degrees.
Using a hand mixer, beat cream cheese and sour cream until well combined. You can do this by hand if your cream cheese is soft enough. Stir in salt, pepper, onion, chives, spinach, and diced chicken.
Using Pillsbury crescent rolls, take 2 triangular rolls and push together at perforated seam to make into a square. Make sure you seal the perforations well so your filling doesn't come out. Put about 3 tablespoons of chicken mixture in the center of each square. Fold the dough corners to the center over the chicken mixture forming a pillow.

Place chicken pillow on cookie sheet and bake at 350 degrees for 20-25 minutes.

Make gravy by mixing one package of chicken gravy mix, one can of cream of chicken soup and 3/4 can of water in a small pot. Mix together and heat until warm. Serve chicken pillows with gravy poured over top.

This post is linked to a Linky Party over at MOMS CRAZY COOKING!
Wednesday, April 20, 2011
Peanut Butter Easter Eggs (Reese's Copycat)

My FAVORITE candy of all time would be the Reese's Peanut Butter Cup. I love them so much that I try to stay away from them, otherwise I might go a little overboard and feel guilty later. When I was young and had no regrets about what I ate I used to buy whole bags of peanut butter cups and eat them all within a couple days and I didn't think twice about the calories. Those days are long gone (DARN). I still will sneak one every once in a while when my children receive a candy stash of some kind. I tell you, I am in heaven for that 30 seconds it takes to eat it. I stumbled upon this recipe that was apparently a copy-cat version of the Reese's Peanut Butter Cup and wanted to find out for myself if it was possible to make them at home. I must say that they do come pretty darn close. It took all my willpower not to take a spoon and work my way through this peanut butter bliss pictured below.

I am happy to report that I was able to contain myself and finish whipping the eggs up. These will be a fun treat to make with your kids. They can take the peanut butter dough and shape them into eggs. Then after they are dipped in chocolate, they can go at them with the sprinkles. If you are a Reese's fan, your going to enjoy these for sure.
Peanut Butter Easter Eggs (Reese's Copycat)
recipe source Confessions of a Cookbook Queen
9 graham cracker sheets, crushed into fine crumbs
6 Tbsp butter, softened (6 Tbsp)
1 cup smooth peanut butter
1 1//2 cups powdered sugar
Candy Melts or Almond Bark
In the bowl of a stand mixer combine all the ingredients except for the candy melts. Mix on low until fully combined. You can do this by hand as well if desired.
Shape the mixture into egg shapes. The easiest way to do this to roll some dough into a golf ball sized circle and then shape into an oval. Place on wax paper lined baking sheet and freeze for at least 1 hour. (I was out of wax paper so I just sprayed some foil and it worked fine)


Thursday, April 14, 2011
Cheeseburger Flatbread Melts

I like coming up with different ways to make ordinary food. Take your typical cheeseburger for instance. Everyone is used to eating a grilled patty with cheese between a bun. They are always a favorite of just about everyone, but nothing special or unique. This recipe is a twist on the old favorite. The meat has all the flavor of a cheeseburger because it is simmered with ketchup, mustard, and onion. It is served on delicious buttery flatbread rather than a bun and topped with shredded cheese. I think that if your family loves burgers they will enjoy with unique way of eating them. They are easy to throw together so you can have dinner on the table quick. I added some black beans to stretch the meat and add some fiber. What's not to love? I found this recipe over at Kevin & Amanda. It is a great blog if you have a chance to check it out. She gave some other ideas for the use of flatbread such as:
Cheeseburger Flatbread Melts
slightly adapted from kevinandamanda.com


Tuesday, April 12, 2011
Southwestern Egg Rolls (Baked)

I have a new obsession. I used to see these little things in the produce section all the time and wondered what fun things I could do with them. I finally broke down and bought some one day. I am so glad I did. Do you want to know what I am talking about? Well here they are:

Egg roll wraps are wonderful. You can adapt them to fit just about any cuisine whether it be Italian, American, Mexican, Asian, you name it. You can even wrap up something sweet and make a killer dessert. I am excited about experimenting with that more in the future. I found a recipe in a Taste of Home magazine for a Southwestern Style Egg roll and I adapted it a bit to suit our family more. For one thing, it called for spinach which I like but I didn't think my kids would like seeing that stringy green stuff when they bit into them. I also left out the green onions and the cayenne pepper because I did want my children to actually eat them. The original didn't have chicken in it but I added it because this was dinner for us and I wanted something more substantial. You can see how you can make these to suit your families tastes. My kids actually wanted ketchup to dip them in (GAG). Just do what you want and enjoy!
Southwestern Egg Rolls (Baked)
adapted from Taste of Home Magazine
1 (15 oz) can sweet corn, drained or 2 cups frozen corn, thawed
1 (15 oz) can black beans, rinsed and drained
1 (4 oz) can diced green chilies
1 cup cooked, shredded chicken
1 cup shredded Mexican style cheese
1 tsp ground cumin
1/2 tsp chili powder
3/4 tsp salt
1 (1lb) package egg roll wrappers
In a large bowl, mix everything together except for the egg roll wrappers. Lay an egg roll wrapper on a work surface so that one of the corners is facing you. Place 1/4 cup of the filling in the center like so:

Now fold the tip closest to you up over the filling like this:

Now fold the points pointing outward in towards the center to resemble an envelope:

Now continue to fold over until a small part of the remaining tip is showing. Moisten the edges with water and finish rolling to press the seal closed. Repeat with remaining wrappers and filling. Place them on a greased baking sheet seam side down. Spray the tops with cooking spray and sprinkle with a light sprinkling of salt.

Bake in a preheated 425 F oven for 12-15 minutes until lightly browned. Make sure to turn halfway through baking to brown evenly. Serve with salsa, sour cream, or guacamole.
Makes about 18-20
This post is linked to At Home With Haley & Moms Crazy Cooking
 Labels:
Appetizers,
Beans,
Chicken,
Healthy,
Kid Friendly,
Main Dish,
Mexican,
Quick and Easy
|
Labels:
Appetizers,
Beans,
Chicken,
Healthy,
Kid Friendly,
Main Dish,
Mexican,
Quick and Easy
|
 4
comments
|
4
comments
|
Wednesday, April 6, 2011
Zucchini Soup

I know it might sound a little crazy but it was in the 80's yesterday and I had a hankering for some soup. Not just any soup, it had to be this Zucchini Soup. I am a huge fan of soup. I love to make it, I love the way it smells, and most importantly I love to eat it. So far of all the soups I've ever made, this one is my favorite. Is that not a bold statement? It is quick and easy, you don't even have to chop the veggies very much. It is also healthy (think swimsuit season) and a great way to use up the bounty of zucchini that everyone seems to get, I wouldn't know what that was like though. This makes the light meal when paired with some kind of dinner roll. I made my Orange-Buttermilk Dinner Rolls, which are my favorite rolls to go along with my favorite soup. I hope you enjoy!
Zucchini Soup
1/2 small onion cut into chunks
2 garlic cloves
3 small zucchini with skin on, cut into chunks
2 peeled carrots cut into chunks
32 oz chicken stock
2 Tbsp light sour cream or Greek yogurt
salt and pepper to taste
Combine chicken broth, onion, garlic, zucchini, and carrots in a medium pot and cook on medium heat.
Bring to a boil, lower heat, cover, and simmer until tender, about 20 minutes. Remove from heat. Puree; Add the sour cream. Using an immersion blender, puree till smooth. You can also do this in a blender with the lid off to let the steam escape.
Stir in remaining ingredients, and adjust seasonings to taste. Serve hot.
Bring to a boil, lower heat, cover, and simmer until tender, about 20 minutes. Remove from heat. Puree; Add the sour cream. Using an immersion blender, puree till smooth. You can also do this in a blender with the lid off to let the steam escape.
Stir in remaining ingredients, and adjust seasonings to taste. Serve hot.
Friday, April 1, 2011
Spinach & Cheese Stuffed Chicken

Chicken is my meat of choice. Spinach is my vegetable of choice. They come together beautifully in this Spinach & Cheese Stuffed Chicken. I enjoy stuffing and rolling chicken with different ingredients. It's kind of fun and pretty when they are cut into. This is one that you won't feel guilty about eating because it is quite healthy but I assure you the taste is not compromised. This is a good way to get some vegetables into your kids, or yourself for that matter. I hope you enjoy!
Spinach & Cheese Stuffed Chicken
6 boneless skinless chicken breasts
1 box 10 oz frozen spinach thawed and well drained
3 oz 1/3 less fat cream cheese, softened
1/4 cup shredded Parmesan cheese
1/2 tsp dried basil
1 clove garlic, minced
1/4 cup egg substitute
12 whole wheat crackers such as Ritz
1 tsp dried basil
Preheat oven to 375 F. Spray a 9x13 baking dish with cooking spray. Between pieces of plastic wrap, place each chicken breast and gently pound with meat mallet or rolling pin until 1/4 inch thick.
In a medium bowl, mix spinach, cream cheese, Parmesan cheese, 1/2 tsp basil and the garlic until well blended. Spread about 1 large Tbsp spinach mixture over each breast and roll up tightly. If necessary, secure with toothpicks.
In a small bowl, place the egg substitute. In another shallow bowl, mix cracker crumbs, 1 tsp basil and a dash of pepper. Dip each chicken breast into the egg substitute; coat with crumb mixture. Place seam side down in baking dish.
Bake for 35-40 minutes or until thermometer inserted into the center of chicken reads 165 F. Remove toothpicks before serving.

Subscribe to:
Posts (Atom)


 Posts
Posts


- momof2girls
- One of the many jobs I have as a stay at home mom is to cook. I love being in the kitchen and creating yummy dishes to feed my family. I started this blog as a way to virtually capture my most valuable recipe creations and finds. I hope you enjoy!


